Advanced Microscopy
Condenser Astigmatism
Do the following in order to check if there is condenser astigmatism:
Set data acquisition magnification, eucentric height, in focus
Insert screen
centre beam with beam shift
Condense beam (adjust intensity)
Go few times through the cross-over to check that it remains circular.
If the beam does not expand circularly, remove the C2 astigmatism as follows:
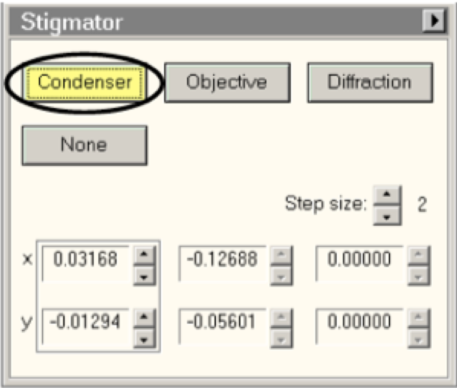
select the Stigmator tab > condenser. There are three sets of numbers (see image below). Box around selected set. Can save by right click & copy.
Adjust condenser astigmatism with XY multifunction knobs.
Keep going up & down on intensity to get cross-over & check beam shape.
When the beam stays circular going though the cross-over, click ‘None’ (means no astigmatism).
Condenser Aperture
Do the following in order to check that the condenser aperture is centred using the flu screen. 1. Condense the beam and center it with the trackball. 2. Expand the beam with the intensity knob (clockwise) and make sure that it expands symmetrically (repeat expanding the beam also anticlockwise). 3. The beam has to expand symmetrically both ways for the C2 aperture to be centered. 4. If the aperture is not centered go to the Aperture tab, click on Condenser > adjust and center it with multifunction X and Y. 5. Once done click adjust again.
Beam Tilt Pivot Points
Do the following in order to align the beam tilt pivot points.
Insert screen.
Condense the beam to a little circle (alternatively you could also decrease the magnification).
In Direct alignments, press Beam tilt-pp X.
Minimise the movement of the beam tilt pivot points using multifunction x (y is not active).
Repeat the same for Beam tilt pp Y.
Press done.
Retract screen.
Objective Aperture centering
Do the following in order to centre the objective aperture.
Set data acquisition presets.
Press ‘Diffraction’ on the control panel.
Adjust the intensity of the flu-screen so that you see both the direct beam and the aperture disk.
Go to the Aperture tab and select the desired objective aperture.
Click on ‘Adjust’ and centre the aperture disk onto the direct beam using multifunction x&y.
Click ‘Adjust’.
Press ‘Diffraction’ again.
Answer EPU question with ‘Yes’.
Parallel illumination
With parallel illumination, the beam is parallel to the optical axis between the upper and lower pole pieces. This is important in TEM to get the same magnification and defocus independent of distances from the optical axis. The condition to have parallel beam is to have the last cross-over before the upper pole-piece in the front focal plane of the objective lens.
Two vs three condenser lens systems
In three-condenser lens systems (such as the Titan Krios), parallel illumination condition is maintained by the C2-C3 zoom, where the C3 lens compensates when changing the intensity (i.e. the beam size) to move the cross-over to the front focal plane. Thus, one can have parallel beam in a large range of intensity settings (the TEM User Interface tells you when you have parallel beam on a Krios).
On Talos/Glacios systems with two main condenser lenses, one can obtain some degree of zoom using the mini-condenser lens situated just above the upper-pole piece of the objective lens, in the so called microprobe (μP) mode. However, using the minicondenser will result in a larger beam (several micrometers).
By disabeling the minicondenser in nanoprobe (nP) mode, the apparent source of the beam will be farther away and thus appear smaller and consequently give a smaller beam. Having only two condenser lenses in nP mode, one can only independently set one beam parameter, which is the brightness using the C1 condenser lens (spot size). The C2 lens (Intensity knob), which is normally used to set the beam size, is instead used to move the cross-over to the front focal plane of the objevtive lens to get parallel illuination. Therefore, on a two condenser lens system, parallel illumination can only be obtained with a single beam diameter for a specific spot size. On the Talos/Glacios, the parallel beam is approximately 1.8 micrometer in diameter.
Setting/checking parallel illumination
Due to the symmetry of the objective lens, having a cross-over in the front focal plane approximately coincides with having the diffraction plane in the back focal plane, where the objective lens aperture is situated. Therefore, to set parallel illumination, one changes the intensity (C2 lens) to ensure that the diffraction plane is in focus when the objective aperture is in focus.
Procedure:
Start with a well-aligned microscope
Load a calibration sample, preferably a cross-grating, but the gold foil of UltAufoil grids also works or even carbon.
Go to a nice clean area.
Bring the sample to eucentric heigh. To make sure to get this accurate, (also) do it at hole/eucentric height magnification, e.g. 11,000x magnification.
Focus the sample
Set what you believe is parallel illumination, i.e. the Data acquisition setting.
Insert the fluorescent screen
Got to diffraction mode by pressing the button on the hand panel. If EPU is running, it will complain, but just ignore that.
Insert the 100 μm objective aperture
Go to diffraction camera lenght D850 mm by turning the Magnification knob on the hand panel
Bring the aperture in focus by turning the Focus knob on the hand panel. You may have to adjust the brightness of the image using the scroll-wheel to see clearly. It can also be easier to see the edge of the aperture, if moving the aperture so that it overlaps with the central speckle (Aperture => Objective => Adjust => Multifucation X and Multifuction Y).
Set parallel illumination by making the diffraction pattern appeaar as sharp as possible by turning the Intensity knob on the hand panel.
Iterate between these too steps until both feature are in focus.
For higher accuracy, increase the camera length to D5.7 m or longer and make the central speckel as large as possible. The high-resolution mode of the flu-screen can be useful.
Once happy, note down the value of the intensity (C2) aperture, which will be the parallel illumination setting for that gun lens and spot size.
Center the objective aperture and exit the diffraction mode.
For detailed notes, please read Herzik (2020).
Parallel illumination at gun lens 3, Glacios F3EC, Uppsala University
Spot |
C2 |
Intensity (EPU) |
|---|---|---|
1 |
46.963% |
0.437 |
2 |
44.619% |
0.441 |
3 |
42.605% |
0.444 |
4 |
41.147% |
0.447 |
5 |
39.906% |
0.450 |
6 |
38.965% |
0.451 |
7 |
38.204% |
0.453 |
8 |
37.596% |
0.455 |
9 |
37.166% |
0.456 |
10 |
36.848% |
0.456 |
11 |
36.615% |
0.458 |
References
Herzik, et al. (2017) https://doi.org/10.1038/nmeth.4461
Herzik (2020) https://doi.org/10.1007/978-1-0716-0966-8_6